Summer does something to you...
Havent been painting a single spot in two months time. So much comming upp; kayaking, hammocking and fishing, not to talk about work. But vacation is coming!
My biggest problem is that my ratio at which I buy new models haven't decreased. Almost bought the whole model range for WoC and started collecting Orcs and Goblins. As if I hadn't already got way to much unpainted models. Let's hope for bad weather from elveneth of July!
Wednesday, 25 June 2014
Tuesday, 13 May 2014
Why not to buy Iwata from Ebay
Just... Dont do it!
I have learned the hard way. Bought mine from a seller stationed in Japan beacuse the price was way lower than here in sweden (we have to pay about 170£ if we buy it via a Swedish retailer). I was a bit worried that it could be a fake, but it looked authentic with the name engraved on the body and not printed. When I compared it to my friends Iwata Eclipse every part looked exactly the same. The only difference is that my friends airbrush works and mine does not. I don't like tho whine, but I would like to say that it's a pretty huge difference.
I tried everything in the book. We even changed the parts between our airbrushes. His worked with my parts, but mine didn't work with his parts. I took it apart completely but to no awail. Only thing i can think of is the gasket in the air valve that may interrupt the airflow in some way and causing it to skip. I took it apart but I couldn't see any obvious damage to the gasket. Otherwise it has to be the air canal that run through the body that's not correctly manufactured.
Warranty should be the best option, right? Well, it ain't. This is why you shouldn't buy your Iwata from Ebay, unless you can find the seller as an authorized retailer listed on Iwatas website. I cant press this enough, just.... just dont do it! That extra £ is totaly worth it. Anyway, now I've ordered a new one from www.spraypal.com and yes, they are a listed retailer so my 5-year warranty won't be void. Yay!
Turned out to be a very expensive airbrush in the long run and I've lost some of my creative spark during the process but I'm sure it will return to me when i receive my brand new gun.
Wednesday, 30 April 2014
Airbrush skipping problems
Wow, just.... wow.
Recieved my brand new shiny Iwata Eclipse about 3 weeks ago. After rummaging about for a while I found a compressor that should do the job with getting something out of it, an AS189 with tank and airfilter. I was happy as an otter when it arrived and fast as a shark to get the painting going.

Said and done, connected the brush to the compressor. Put it to 30 psi to begin with and diluted my paint with about 3/1 ration of water/paint. Then I went to try some doodles on a piece of paper- This is when the shit hit the fan. Oh, the horror! From the very first line i tried to draw it began skipping. For you who don't know what skipping is: Skipping is when you get a broken line when spraying with your airbrush. Paint flows, creating a beatiful thin line only to stop and only give air. Starts flowing again, stops, starts, stops etc.
I thought it would be an easy fix. Changed the psi to 20- Same problem. Thinning the paint even more- Same problem. 15psi maybe? Nope! Thinned the paint to almost water and then it flowed as it should, but the paint is way too thin and splashes of the pressure if you try to put it onto a model. This is when I went into forum berzerk-mode. I checked every single site I could find about the problem:
I'm a wee bit worried about the Iwata. It was listed as 0.3mm needle and Eclipses don't come with 0.3mm needle but I took it for being a typo from the seller . It also came with the wrong spanner, a spanner made for screw-on nozzles, not self centering as the Eclipses. Fraud maybe? Looks authentic thou and came in sealed package.
Hopefully there's problem with the compressor since it's the cheapest equipment so I can send it as a warranty errand and buy a cheap one from a local store while waiting.The Iwata is ordered from Japan.
Recieved my brand new shiny Iwata Eclipse about 3 weeks ago. After rummaging about for a while I found a compressor that should do the job with getting something out of it, an AS189 with tank and airfilter. I was happy as an otter when it arrived and fast as a shark to get the painting going.

Is this the rascal in this drama?
Said and done, connected the brush to the compressor. Put it to 30 psi to begin with and diluted my paint with about 3/1 ration of water/paint. Then I went to try some doodles on a piece of paper- This is when the shit hit the fan. Oh, the horror! From the very first line i tried to draw it began skipping. For you who don't know what skipping is: Skipping is when you get a broken line when spraying with your airbrush. Paint flows, creating a beatiful thin line only to stop and only give air. Starts flowing again, stops, starts, stops etc.
I thought it would be an easy fix. Changed the psi to 20- Same problem. Thinning the paint even more- Same problem. 15psi maybe? Nope! Thinned the paint to almost water and then it flowed as it should, but the paint is way too thin and splashes of the pressure if you try to put it onto a model. This is when I went into forum berzerk-mode. I checked every single site I could find about the problem:
Paint stuck in the nozzle:
Cleaned the whole gun thoroughly and tried to look if I could see some paint residues in the nozzle but to no awail. I even took it to a friend of mine who works as dental technician and borrowed their ultrasonic cleaner and let it soak in 30 minutes. Problem persists.
Damaged needle:
Needle looks fine. Dont feel as sharp as my ancient airbursh though so could be a manufacturing problem, but no bend or other damage that i could see. Going to compare to a friends Eclipse soon.
Compressor issues:
Water in the air? Hard to say, tank and airfilter should minimize any traces of water. Pressure problems? Also hard to say, tried to hold a steady flow against the skin but coudnt feel any changes in the pressure. Going to try it with another compressor at previous mentioned friends place.
I'm a wee bit worried about the Iwata. It was listed as 0.3mm needle and Eclipses don't come with 0.3mm needle but I took it for being a typo from the seller . It also came with the wrong spanner, a spanner made for screw-on nozzles, not self centering as the Eclipses. Fraud maybe? Looks authentic thou and came in sealed package.
Hopefully there's problem with the compressor since it's the cheapest equipment so I can send it as a warranty errand and buy a cheap one from a local store while waiting.The Iwata is ordered from Japan.
Friday, 4 April 2014
Iwata incoming
Oooh, I´'m exited. After some long thoughts and a bit of research i finally decided which airbrush to go for. I had Iwata in mind pretty early since that's the brand that turned up on most searches and seems to be a solid choice. The hard part was to decide which model.
I tend to go for expensive stuff when I buy something, this is how my mind works; 1. I start looking at the cheapest alternative. 2. I Look at the second cheapest, thinking "Hmm, not a biggie. Lets go for that one instead." Then repeat step 2 untill my bank account reach its pain treshold or no more costly options are available. This time I restrained my impulses to go for the super-mega-top-notch-high-line-model. My vote went for the Iwata Eclipse HP-CS. Not the cheapest one and not the most expensive either. The pro's seem to agree that it´s a good choice for first timers and an allrounder.

Ordered it from ebay since it's half the price compared to Swedish retailers. I'm a bit worried though since I noticed that the description says that it got a 0.3mm nozzle and as far as I know they only come with .35mm. It's new and unopened so it's not modified in any way. Hopefully thats just a mistyping from the seller and not a fraud, fingers crossed. But they had only possitive feedback so I should be okay. Otherwise I'll be forced to make a trip to Tokyo to clear the air with someone.
Also a .3mm could prove to be more of a challenge to use. I know for a fact that airbrushing isn't easy. I got myself a real low budget one many years ago. With low budget I mean really low budget. You know the kind of equipment they make from broken parts that they sweep from the floor. Then put together to some kind of abomination that even the 7:th circle of hell would be proud of.
I was doing mural paintings at that time for a laser tag arena and it wasn't pretty on close inspection, lots of stains and splashes. As I'm older and wiser now (ehr...) I understand that much of my problems then was partially caused by too thick paint in the gun. But my first first tries with the Iwata will probably make puppies cry in despair anyway. I'm not looking for miracles to happen beacuse of the equipment, but it will surely speed up the process with laying the initial shadow and highlights.
I tend to go for expensive stuff when I buy something, this is how my mind works; 1. I start looking at the cheapest alternative. 2. I Look at the second cheapest, thinking "Hmm, not a biggie. Lets go for that one instead." Then repeat step 2 untill my bank account reach its pain treshold or no more costly options are available. This time I restrained my impulses to go for the super-mega-top-notch-high-line-model. My vote went for the Iwata Eclipse HP-CS. Not the cheapest one and not the most expensive either. The pro's seem to agree that it´s a good choice for first timers and an allrounder.
Full plate and packing steel
Ordered it from ebay since it's half the price compared to Swedish retailers. I'm a bit worried though since I noticed that the description says that it got a 0.3mm nozzle and as far as I know they only come with .35mm. It's new and unopened so it's not modified in any way. Hopefully thats just a mistyping from the seller and not a fraud, fingers crossed. But they had only possitive feedback so I should be okay. Otherwise I'll be forced to make a trip to Tokyo to clear the air with someone.
Also a .3mm could prove to be more of a challenge to use. I know for a fact that airbrushing isn't easy. I got myself a real low budget one many years ago. With low budget I mean really low budget. You know the kind of equipment they make from broken parts that they sweep from the floor. Then put together to some kind of abomination that even the 7:th circle of hell would be proud of.
I was doing mural paintings at that time for a laser tag arena and it wasn't pretty on close inspection, lots of stains and splashes. As I'm older and wiser now (ehr...) I understand that much of my problems then was partially caused by too thick paint in the gun. But my first first tries with the Iwata will probably make puppies cry in despair anyway. I'm not looking for miracles to happen beacuse of the equipment, but it will surely speed up the process with laying the initial shadow and highlights.
Thursday, 27 March 2014
Guts 'n Glory: Chaos Lord of Nurgle
All work and no play makes Stefan a dull boy.
All work and no play makes Stefan a dull boy.
All work and no play makes Stefan a dull boy.
All work and no play makes Stefan a dull boy.
Despite all the boring stuff I rewarded myself with a bit of playtime; that Chaos Lord have been standing on the shelf for way too long time now, tantalizing me to paint him. So thats what I did, he´s gonna get it good!. Not much done yet, only a couple of base layers and a few glazes here and there to catch the overall look. Planning to do my first stumbling attempts of NMM on the axe since it´s quite a big piece that shouldn´t be too difficult. At least I hope so.
It´s not a very clean paintjob so far but i should be able to make it a bit smoother with a bit of work. Only put about 45 minutes on him so far, mostly trying different purples on his stomach. But I´ll get there eventually. He really is a delight to paint, lots of little details (or infections). No wonder that he got so much exposure, it´s an awesome model.
Here he is:

Think I´ll give him a rest for a while now so i can grab myself in the collar and finish the cannon fodder (Marauders) They´ve been gathering dust for too long now.
Tuesday, 18 March 2014
Pimp my Warrior
Long time no see.
Back at the paint rack at last. Been busy with work and rereation the past weeks. Took a ski tour to a cabin in the woods for some table rpg with old time friends and it was a blast. Lots of shenanigans for 3 days.
Anyway. While in the woods I loitered on ebay for a while and found some cheap Warhammer stuff for my Warriors of Chaos (or Marauders) and today they came to my mailbox. Bring out ze heads!:

Yep, Space Wolves Heads. Most of them are going to look good on my minis, not sure about the one with the helipad/flat top haircut. Looks bit too posh for a frothing maniac, but I can put him in the middle ranks just to get some extra diversity. There´s also some hi-tech armor plates on the back of the head, but thats not a problem, at least not on the Warriors since the fur trimming on the cloaks will hide them from view. Also got three helmeted heads that´s going into the bitbox of oblivion. I´ve got no plans whatsoever of turning to the dark side (40k).
Now over to another topic. I feel quite certain about which paintscheme to go for with my warriors now. Wrote about them in my previous post- The internet is for Khorne and I´m going for the dark red theme so the ever elusive step by step will be here in a near future.
Thats all!
Wednesday, 5 March 2014
The internet is for Khorne
At last I've got some time on my hands to do some painting. I've mentioned earlier that i would present a step by step when creating a color scheme for my Khorne warriors, unless it came out looking like something the cat dragged in. Turned out it came out just like that. Well, not completley.
I actually tried out 2 different approaches on red. I've read that painting red (pun not intended) is a pain to paint and I can't do nothing but agree. It is a pain. This is what I came up with:
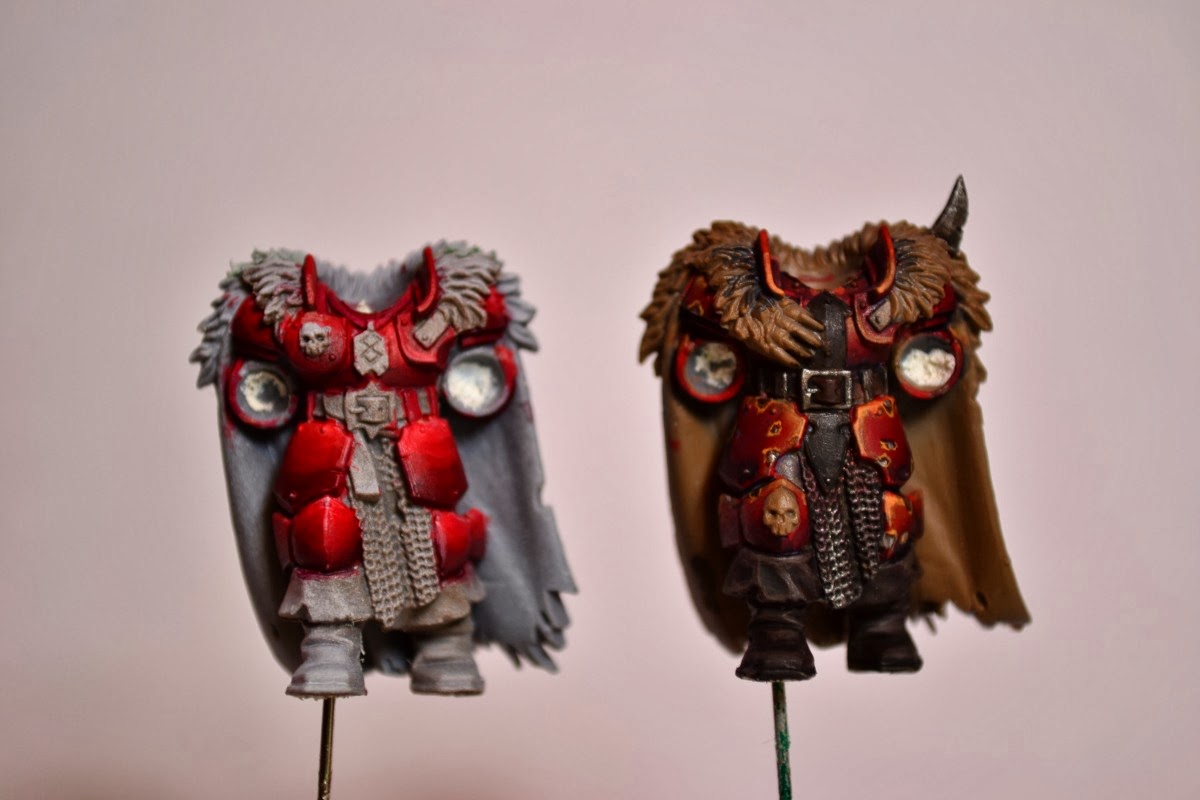
The lef one could have turned out good but I think that I thinned the paint a bit too much or used wrong brush technique since the toning came out quite uneven with lots of streaks. Take a closer look by clicking the picture and you´ll see what I mean. It's also way too bright red. Top side is that it´s good contrast and looks good from afar, but on the other hand pretty much everything looks good at a distance.
Maybe if I mute it down with some blue glaze. Who knows, could take a bit of the streaks away.
I'm more pleased with the right one, It got a more Khorny look but still not exactly what I'm looking for. It don't pop so well from a distance. Maybe change my mind if I see them en masse. What speaks for this color scheme/tone is that it was quick to paint.
I'll give the left style another go tomorrow but going to try to go darker. From black up to bright red but starting with the brighter tones further up and try with thicker paint. This one was about 1:8 paint to water while the right was more like 1:3 ratio. I´m not looking for super smooth but still better than what i achieved here. Practice makes perfect, hopefully.
Minsc of the day:
"My hamster does not like your tone, away with ye!"
Friday, 28 February 2014
Warhammer Visions: March edition sneak peek
Laid my hands on the second Warhammer Visions today and had a quick look through the pages. And as everyone probably know it´s mostly about Dwarfs. It all starts with the Latest Releases where we get to see what we´ve
already seen, provided that you read the february editions of White
Dwarf Weekly.
Some of the pictures following will show up the wrong way since blogger decides to flip it by despite they are correct on my hard drive. They may be a bit blurry since I took them with my phone at work

Then there is the Forge World pages presenting their latest releases consisting of 40k only. I wish they could release some Fantasy more frequently:

Then we have the Army of the Month chapter consisting of the Imperial Guard. Impressive work as usual:

Here comes the best part, the Parade Ground, 52 pages of goodness. I know, everyone says that you can find pictures on the internet. I say it´s not even close to the same thing as having it on print. Call me old fashioned, but a screen just don´t do it for me.

Over to the next chapter; The Battle Report I guess it would be called. Not that it is a battle report, only more pictures of Dwarves with a minimum of text saying nothing. A few shots of the opposing army, Skaven in this case (I want to emphasis few shots).

Moving to the Kit Bash. Not much bashing it seems, mostly green stuffing in the cracks. Edit: Ok, maybe there is some conversion done here, I´m not famailiar enough with 40k but after skimming through it again I see that there are parts from other models:


Have a pleasant weekend, I won´t for sure. Work awaits.
Some of the pictures following will show up the wrong way since blogger decides to flip it by despite they are correct on my hard drive. They may be a bit blurry since I took them with my phone at work
Then there is the Forge World pages presenting their latest releases consisting of 40k only. I wish they could release some Fantasy more frequently:
Then we have the Army of the Month chapter consisting of the Imperial Guard. Impressive work as usual:
Here comes the best part, the Parade Ground, 52 pages of goodness. I know, everyone says that you can find pictures on the internet. I say it´s not even close to the same thing as having it on print. Call me old fashioned, but a screen just don´t do it for me.
Over to the next chapter; The Battle Report I guess it would be called. Not that it is a battle report, only more pictures of Dwarves with a minimum of text saying nothing. A few shots of the opposing army, Skaven in this case (I want to emphasis few shots).
Moving to the Kit Bash. Not much bashing it seems, mostly green stuffing in the cracks. Edit: Ok, maybe there is some conversion done here, I´m not famailiar enough with 40k but after skimming through it again I see that there are parts from other models:
Then there is the Blanchitsu. Wish that the text was left. Well there is text, about a sentence per page. Would be nice to read about how they thought whne creating these models:
This is followed by a showcase of some Kabal Armies and even more Dwarfs. The grand finale is made out of the Paint Splatter section, don´t expect anything new here, it´s only the WD Weekly gathered in one spot:
So what is the verdict? Well, you could get this edition if you haven´t read the WD Weekly editions already. If you have i wouldn´t recomend it, only for the Parade Ground maybe or if you want to get better close up pictures of the Dwarf models. You could also have use for it if you have too much money and need something to spend it on.
Have a pleasant weekend, I won´t for sure. Work awaits.
Thursday, 27 February 2014
Hammer Time! (and some sprues)
Oh yeah!
Was about to start painting on some Khorne Warriors today and take pics of the process while at it for a Step by Step. But as i stood there, brush in my hand and all, i recieved a letter that my package had arrived. Well, that put an end to my thoughts of painting as i laid my hands on these fine looking magazines:

Found them on Ebay for about £11, twelve issues of glory all in all, hardly touched by human hands. A fair price if it weren´t for the shipping that added £5 but still affordable considering the quality of the content. It´s such a huge difference between WD today compared to 4 years ago. The painting tips were awesome. Lots of terrain tips and tutorials, in depth army tactics and lots of fluff. What happened? Guess that´s a question you can ask yourself about the quality of pretty much everything today, so no hard feelings Games Workshop. It´s all ´bout the money nowadays.
Khorne will have to wait, twelve issues of White Dwarf on the other hand can´t wait. But after that I´ll make sure to put up that Step by Step (unless i fail miserably with the painting) At least I managed to put up some pictures of the contents of the Warriors of Chaos box, you can find it here here.
Saturday, 22 February 2014
Chaos Marauder Horsemen Sprue Overview
Hey hey!
Been a busy week with no room for painting and I felt that I deserved a reward for being a good working man. So I went to my local Games Workshop retailer Iocus for a chat with the store owner. I can really recommend you to drop by that store if you by some crazy way should put your feet on Luleå soil.
Had a rummage through the Warriors of Chaos shelf for something that would trigger my brains reward regions without emptying my bank accounts money regions. Actually, pretty much anything in miniature way triggers the former.
Anyway. You can never have enough cavalry. And what is better than cavalry made out of ravaging mad men? Possibly ravaging mad men with striated torsos, froth foaming from their mouths I would say! So a package of Marauder Horsemen hit the desk together with a bottle of Druchii Violet wash (or shade as GW calls it) and Castellan Green.
I decided to take a photo of the sprues before I went bat shit crazy on them with my scalpel. May be good to remember what you get from them for future converisions. Bits, the best a man can get! Here they are:

So what do we have here? Quite a lot I would say. You actually get two of the sprue above. Lots of chaos stars, hooks and skulls.... on chains!! Scrawny horses (no time for eating, just killing) and beefy torsos (lots of protein when your diet consists of blood n' guts). Not that you will have any left of those unless you´re going to use the Marauders as knock-kneed cowboys on foot and magic unicorns . Some classic Marauder flails, spears and axes plus gnarly arms.
And the third one:

Oh yeah, heads! Seventeen of them, twelve left when everything is assembled. I love the crazed bearded seniors. "What? Weapons?? I tear heads of with my toothless gums and strangle what´s left of their necks with my beard!" Then there´s one more starved horse, two alternatives for banners. Well, one banner or you can use the spiky bits. Shields- One will be left unless some mad bugger dual wields them. A battle horn made out of skulls from childrens (don´t know what else the small ones would be from). More axes, one of them twin bladed; for bad-asses only.
What can I say? Im very satisfied with what you get. There´s quite a bit left overs to convert some of my regular Marauders and/or Chaos Warriors. I think that the double axe is going to one of my Warrior Champions.
Thats all for today, apart from a few well chosen words from Minsc:
"Go for the eyes Boo, GO FOR THE EYES!! RrraaaAAGHGHH!!!
Been a busy week with no room for painting and I felt that I deserved a reward for being a good working man. So I went to my local Games Workshop retailer Iocus for a chat with the store owner. I can really recommend you to drop by that store if you by some crazy way should put your feet on Luleå soil.
Had a rummage through the Warriors of Chaos shelf for something that would trigger my brains reward regions without emptying my bank accounts money regions. Actually, pretty much anything in miniature way triggers the former.
Anyway. You can never have enough cavalry. And what is better than cavalry made out of ravaging mad men? Possibly ravaging mad men with striated torsos, froth foaming from their mouths I would say! So a package of Marauder Horsemen hit the desk together with a bottle of Druchii Violet wash (or shade as GW calls it) and Castellan Green.
I decided to take a photo of the sprues before I went bat shit crazy on them with my scalpel. May be good to remember what you get from them for future converisions. Bits, the best a man can get! Here they are:
So what do we have here? Quite a lot I would say. You actually get two of the sprue above. Lots of chaos stars, hooks and skulls.... on chains!! Scrawny horses (no time for eating, just killing) and beefy torsos (lots of protein when your diet consists of blood n' guts). Not that you will have any left of those unless you´re going to use the Marauders as knock-kneed cowboys on foot and magic unicorns . Some classic Marauder flails, spears and axes plus gnarly arms.
And the third one:
Oh yeah, heads! Seventeen of them, twelve left when everything is assembled. I love the crazed bearded seniors. "What? Weapons?? I tear heads of with my toothless gums and strangle what´s left of their necks with my beard!" Then there´s one more starved horse, two alternatives for banners. Well, one banner or you can use the spiky bits. Shields- One will be left unless some mad bugger dual wields them. A battle horn made out of skulls from childrens (don´t know what else the small ones would be from). More axes, one of them twin bladed; for bad-asses only.
What can I say? Im very satisfied with what you get. There´s quite a bit left overs to convert some of my regular Marauders and/or Chaos Warriors. I think that the double axe is going to one of my Warrior Champions.
Thats all for today, apart from a few well chosen words from Minsc:
"Go for the eyes Boo, GO FOR THE EYES!! RrraaaAAGHGHH!!!
Monday, 17 February 2014
Chaos Warriors revisited
Phew, what a weekend. Two days in a row of low self discipline. Started the friday evening as board game night that went out of hand when a friend decided to invite some more friends and all of a sudden alcohol consumption got into the picture. Saturday was planned as a night out with my work colleagues and also ended with shenanigans. Need I say that Saturday decided to get even, cursing me with mild head throbbing?
Despite the fact that my head was acting up I decided to defy its subtle warnings of doom if I as much as tried to use my brain. So I sat down by my trusty old paint station to get going on the color scheme for the rest of the Chaos Gods. Decided to go for nurgle this time. Papa Nurgle craves Nurglification so i put some pva-glue onto a shield and dripped super glue on top of it. A nice little trick i found on the net. The water in the pva is reacting with the super glue creating nice wrinkly patterns. Then i painted it in green/yellow/black tones.
It all turned out pretty decent. Didn´t put my soul into since my head was trying to kill me and I think it´s best that way, or it will take ages to paint a large number of models. Here is a pic:

But a shield doesn´t make a warrior so I pushed my luck and started on the Chaos Warrior bodies, hoping that my vengeful head wouldn´t take note of it. I decided that the Tzeentch shield had waited long enough and would be first in line to get a firm hand to hold it. Here I went for the same color scheme as the shield itself, or near enough. Here I ran into a problem, the shield and body kind of melts together as they go in the same color so I tried to darken the body with a dark glaze. Cant decide if I like it or not. Think I have to finish the whole piece first.
Next in line was the Warrior of Nurgle. Decided for a different approach on this one to get a bit more constrast against the shield. Since nurgle is the God of Decay I tried to paint the armor to look really rusty. More rust than metal in this case. Looks decent so far but I think I´ll try to darken the shadow areas further. Then I have to decide which theme to go for; Same color for shield and body or the one with rust (thinking of a shiny one for the Tzeentch with a faint blue glaze)

Minsc time!:
"Then say it louder! We must inspire fear in evil! Quiet tales of hamsters are foolish, but a man and his hamster that tear evil limb from limb? That's scary!"
Despite the fact that my head was acting up I decided to defy its subtle warnings of doom if I as much as tried to use my brain. So I sat down by my trusty old paint station to get going on the color scheme for the rest of the Chaos Gods. Decided to go for nurgle this time. Papa Nurgle craves Nurglification so i put some pva-glue onto a shield and dripped super glue on top of it. A nice little trick i found on the net. The water in the pva is reacting with the super glue creating nice wrinkly patterns. Then i painted it in green/yellow/black tones.
It all turned out pretty decent. Didn´t put my soul into since my head was trying to kill me and I think it´s best that way, or it will take ages to paint a large number of models. Here is a pic:
But a shield doesn´t make a warrior so I pushed my luck and started on the Chaos Warrior bodies, hoping that my vengeful head wouldn´t take note of it. I decided that the Tzeentch shield had waited long enough and would be first in line to get a firm hand to hold it. Here I went for the same color scheme as the shield itself, or near enough. Here I ran into a problem, the shield and body kind of melts together as they go in the same color so I tried to darken the body with a dark glaze. Cant decide if I like it or not. Think I have to finish the whole piece first.
Next in line was the Warrior of Nurgle. Decided for a different approach on this one to get a bit more constrast against the shield. Since nurgle is the God of Decay I tried to paint the armor to look really rusty. More rust than metal in this case. Looks decent so far but I think I´ll try to darken the shadow areas further. Then I have to decide which theme to go for; Same color for shield and body or the one with rust (thinking of a shiny one for the Tzeentch with a faint blue glaze)
"We are the Knights who say NI!"
Going for Khorne next time, maybe the Blood God can remedy my skull, and lé grand finale with Slaanesh.
Minsc time!:
"Then say it louder! We must inspire fear in evil! Quiet tales of hamsters are foolish, but a man and his hamster that tear evil limb from limb? That's scary!"
Thursday, 13 February 2014
To Tzeentch or not to Tzeentch
Alrightie then. Got home from work today and painted up two more Marauder heads before my brain hit into a syntax error and went into a meltdown. Ok, Im exaggerating, it went pretty smooth with the eyes this time. Followed the tutorial that i mentioned in a previous post. You can find it at massivevoodoo.blogspot.com. Awesome blogg filled with great tuts and articles that makes your soul cringe in envy.
Anyway, I had my fill of Marauders for the day and started on another Chaos Warrior shield. Went for a more vibrant color scheme this time, but tried to hold back and not go candy land style all over the place. It came out as a Tzeentch shield this time:

Just to make it easy for me I mixed some Winsor & Newton acrylic retarder into the paint to extend the working time, making it easier to do the gradient as I went for wet blending instead of layering. I just sketched out the gradient going over it with glazes later on to smooth it out a bit. The retarder is very viscous so the paint got a bit thick. Thinned it with a bit of water but it still made the surface a bit rough. But it´s only noticeable at close scrutinization so what the heck. It´s a game table army after all.
Overall I think it turned out quite nice. Would like to use another weathering technique next time. On this one Í just stippled the rust effect onto the surface and painted a few scratches. I´ve read a bit about weathering with hairspray so I think that´ll be my next project, probably Nurgle this time.
Thanks for now.
Minsc quoting time:
"I trust those who prey on children no farther than they can be thrown, even if I manage to throw them pretty far!"
Tuesday, 11 February 2014
Chaos Warrior musings
Planning ahead for the next units to paint as soon as the Marauders are finished. Chaos Warriors are next in line and they are bringing me headaches before I´ve even started on them. Don´t get me wrong, I love painting, it´s the decisions I don´t like. Basically I only have to decide between two different styles. The Colorful one and the not so colorful.
For the colorful one i was thinking of going for one of the usual colors corresponding to one of the Chaos Gods prefered colors. Don´t want to go for the garden gnome style with too strong colors. I´m thinking a muted color cheme, putting some browns into the color to take the edge from it. I´ve previously painted up three of the low budget version, Hobo Warriors from Hell (the three for £6 ones). They are actually the second models that I´ve ever painted so hopefully the upcoming models will be smoother and the colors not screaming "HAPPY UNICORNS GOOO!" in your face. None of these are complete since I tried out different styles. Here goes, be gentle:

Went for a try at the not so colorful style yesterday. Snatched a shield from an unsuspecting Chaos Warrior and tried to get a rusty feel to it. Some corrections needs to be done, maybe a bit more orange to it, but overall it looks okay. The problem I have with this style is that I don´t have a clue how to handle highlights on the model. No problemo on the colorful ones but here.. hmm. Dunno. Time for more experiments. But they are really quick to paint. Here is the stolen shield:

Getting back to the last Marauder heads as soon as I get home from work *Think of a happy place*
Ok, time for the Minsc qoute of the day:
"Take heart fellow adventurers, for you have curried the favor of Boo, The only miniature giant space hamster in the Realm"
For the colorful one i was thinking of going for one of the usual colors corresponding to one of the Chaos Gods prefered colors. Don´t want to go for the garden gnome style with too strong colors. I´m thinking a muted color cheme, putting some browns into the color to take the edge from it. I´ve previously painted up three of the low budget version, Hobo Warriors from Hell (the three for £6 ones). They are actually the second models that I´ve ever painted so hopefully the upcoming models will be smoother and the colors not screaming "HAPPY UNICORNS GOOO!" in your face. None of these are complete since I tried out different styles. Here goes, be gentle:
Went for a try at the not so colorful style yesterday. Snatched a shield from an unsuspecting Chaos Warrior and tried to get a rusty feel to it. Some corrections needs to be done, maybe a bit more orange to it, but overall it looks okay. The problem I have with this style is that I don´t have a clue how to handle highlights on the model. No problemo on the colorful ones but here.. hmm. Dunno. Time for more experiments. But they are really quick to paint. Here is the stolen shield:
Getting back to the last Marauder heads as soon as I get home from work *Think of a happy place*
Ok, time for the Minsc qoute of the day:
"Take heart fellow adventurers, for you have curried the favor of Boo, The only miniature giant space hamster in the Realm"
Monday, 10 February 2014
Head over heels
After long last it came. The day I´ve dreaded to face.Until now I had taken detours to avoid all these vicious heads staring at me from my paintstation, but it had to be done; Face painting. I don´t know what you think about this peculiar task, but personally I die a bit on the inside everytime I have to paint an eye. They are so darn small that more often than not my models looks like they got hit in the head, eyes pointing in different directions.
So like any sane person would do I hunt down some tips on the net, find a nice face painting tutorial and start reading just to be smitten! Why? Well, as it isn´t enough to paint the eye white and try to jam that brush point at the right spot. Nooo, you paint it black first. Then, just to make it a wee bit harder- paint it white, leaving an impossible thin black border and finish the masterwork whit a black dot in the exact middle. And if that wasn´t enough they go through the painting of the iris. How to put an absurdley small pupil in the middle of the iris and then how to paint a reflection in the previously mentioned pupil. WHAT SORCERY IS THIS!? The eyesockets on the models are about 1mm wide, how is that even possible?
Crestfallen I went back to my paintstation and resumed working on those heads. But without mascara, shiny blue eyes and reflection of magical stars in those wells of the soul. This time luck struck and I managed to paint those eyes to a decent look:

Only tweleve heads to go. Hopefully madness won´t get to me before I´m done. If anyone got tips on how to handle those eyes they are very welcome.
"The den of stiiinking evil! Cover your nose Boo, we will leave no crevice untouched!"
So like any sane person would do I hunt down some tips on the net, find a nice face painting tutorial and start reading just to be smitten! Why? Well, as it isn´t enough to paint the eye white and try to jam that brush point at the right spot. Nooo, you paint it black first. Then, just to make it a wee bit harder- paint it white, leaving an impossible thin black border and finish the masterwork whit a black dot in the exact middle. And if that wasn´t enough they go through the painting of the iris. How to put an absurdley small pupil in the middle of the iris and then how to paint a reflection in the previously mentioned pupil. WHAT SORCERY IS THIS!? The eyesockets on the models are about 1mm wide, how is that even possible?
Crestfallen I went back to my paintstation and resumed working on those heads. But without mascara, shiny blue eyes and reflection of magical stars in those wells of the soul. This time luck struck and I managed to paint those eyes to a decent look:
Only tweleve heads to go. Hopefully madness won´t get to me before I´m done. If anyone got tips on how to handle those eyes they are very welcome.
"The den of stiiinking evil! Cover your nose Boo, we will leave no crevice untouched!"
Monday, 3 February 2014
Barking
Set out on an adventure in the woods on yesterdays evening with my girlfriend. It was supposed to be an ordinary evening walk to get away from the telly for a while. That was soon to be changed. Why you ask? Well, turned out the woods were full of.... trees! And trees means bark, and bark means a shitload of stone look-alike in miniature format. I had in secrecy brought my trusty mora-knife (swedish quality!) in the specific case the woods would be full of wood. So we skulked around for about an hour, filling up my bark depot.
We also stumbled upon some poplar trees that had interesting texture so i grabbed some of that and brought it home. This bark is sturdier than the pine bark and dont flake as easily. The flaking of the pine bark means problem when attaching the models since there is a risk that the model breaks loose if you have magnetized them. So I´ll have to pin my models to my bases from now on instead of only glue them into place.
Anyhow, here is a picture showing the poplar bark:
It´s going to need a bit of cleaning since it´s covered with lichen. A toothbrush should take care of that without a problem.
Hamsters and rangers everywhere. Rejoice!
Sunday, 2 February 2014
Failpainted
By Odins beard, what a day...
Got home from work yesterday (weekend schedule farting in my general direction) and decided to start working on the skin tutorial while cooking dinner. Who said that men don´t have simultaneous interpreting huh?
So i started putting down one layer of paint, take a photo of it and tending the tomato sauce while that first layer dried. Then over to paint the shadows- take a photo- set the pasta on cooking. Back to my paintstation, another layer, another photo, food etcetera.
Now that sounds all good right? It sure did... until I took a closer look on the photos. My daylight lamp that puts out whopping 2400 lumen had been a bit too close to the model. My lousy camera on the phone can´t compensate for light of a lesser sun so my Marauder looks lika an albino in the desert and I had to scrap the photos. Fortunately I´ve got one last Marauder that still requires his gnarly torso to be painted. So on thursday I´m going to buy a tripod for my Nikon D3100 so I have better control over the pictures and this time I´ll make sure to take a look at the pictures.
Better get back to work.
Camaraderie, adventure and steel on steel. The stuff of legends!
Friday, 31 January 2014
Painting Flesh
*Sigh* Decisions decisions. Still working on those Marauders and not one of them look the same. Been trying differrent color choices and technique for each one so its going to be a motley bunch. But after long last I´m drawing closer to a color scheme that I´m happy with. At the moment it stands between two choices that you will see on the picture below. A tutorial will come up later as soon as I decide which one to go for.
The guy on the left is a bit "meh". The middle one got smoother gradient on the skin while the far right got a greater contrast. The middle one is nicer on close inspection while the right really pops on the battle field since you can see the details of the musculature better. At the moment I think I´ll go for the right one. I could make the gradient smoother on that one also, but it would mean more layers and of course more time.

I can recommend the Lahmian Medium to anyone who haven´t tried it yet. It really makes the gradients easier than using only water to make glazes. While using water requires you to wipe off the brush a lot to avoid pooling, the Lahmian Medium lets you load the brush with a lot more fluid and it wont pool as much. At least thats my opinion. I guess there are a lot cheaper alternatives in the Winsor & Newton range for example. I just have to find out what their medium is called.
Better get back to work before anyone notice me loitering. Adieu!
The guy on the left is a bit "meh". The middle one got smoother gradient on the skin while the far right got a greater contrast. The middle one is nicer on close inspection while the right really pops on the battle field since you can see the details of the musculature better. At the moment I think I´ll go for the right one. I could make the gradient smoother on that one also, but it would mean more layers and of course more time.
I can recommend the Lahmian Medium to anyone who haven´t tried it yet. It really makes the gradients easier than using only water to make glazes. While using water requires you to wipe off the brush a lot to avoid pooling, the Lahmian Medium lets you load the brush with a lot more fluid and it wont pool as much. At least thats my opinion. I guess there are a lot cheaper alternatives in the Winsor & Newton range for example. I just have to find out what their medium is called.
Better get back to work before anyone notice me loitering. Adieu!
Wednesday, 29 January 2014
Miniature Mounting
Today I´m about to show you how i prefer to mount my miniatures to facilitate the painting process. But first a word of warning: I´m probably doing it the same way as most of you do with some minor exception.
My favourite is a shaft from a shave brush that i found in the dumpster. Yes, I have a fetish for dumpster diving. I cleaned it thoroughly, mind you! Had to do a bit of advanced engineering to make the mounting easy. Things like cutting off the bristles (which i save for grasstufts, they are perfectly coloured for use as long, dead grass) And carve out the glue that held the bristles in place. A process that took quite a bit of violence and penetrating trauma with a drill. Some objects were hurt during the making. After enough brutality had taken place i jammed a cork into the gaping wound.
Another one is made of a large paint brush that i also removed the bristles from and glued a cork on its tip. It provides a firm grip and I can hold the miniature steady when painting details like eyes. I got a wee problem with shaky hands from time to time. Mainly beacuse of my diabetes when my sugar levels are low, or coffe intake of deadly proportions.
The rest are made of ordinary wine corks. The ones from sparkling wine are the best in my opinion. Good grip and brings that luxurious air. Real Champagne corks are of course the very top of the line, the Créme de la Créme. Just put on that flamboyant feather boa and set your butler to clean those kolinsky sable brushes hair by hair while sipping on that bottle of sparkly.
The priming stands are not quite as lavish- Bits of insualtion foam. Don´t want to mess up those Champagne corks.
Anyway, here they are. You can see that exclusive Champagne cork in the background. The far left is the mutilated shaving brush. Second is a Birra Baladin cork, i can really recommend that beer, and yes; the brand is really important for the painting!

Over and out!
My favourite is a shaft from a shave brush that i found in the dumpster. Yes, I have a fetish for dumpster diving. I cleaned it thoroughly, mind you! Had to do a bit of advanced engineering to make the mounting easy. Things like cutting off the bristles (which i save for grasstufts, they are perfectly coloured for use as long, dead grass) And carve out the glue that held the bristles in place. A process that took quite a bit of violence and penetrating trauma with a drill. Some objects were hurt during the making. After enough brutality had taken place i jammed a cork into the gaping wound.
Another one is made of a large paint brush that i also removed the bristles from and glued a cork on its tip. It provides a firm grip and I can hold the miniature steady when painting details like eyes. I got a wee problem with shaky hands from time to time. Mainly beacuse of my diabetes when my sugar levels are low, or coffe intake of deadly proportions.
The rest are made of ordinary wine corks. The ones from sparkling wine are the best in my opinion. Good grip and brings that luxurious air. Real Champagne corks are of course the very top of the line, the Créme de la Créme. Just put on that flamboyant feather boa and set your butler to clean those kolinsky sable brushes hair by hair while sipping on that bottle of sparkly.
The priming stands are not quite as lavish- Bits of insualtion foam. Don´t want to mess up those Champagne corks.
Anyway, here they are. You can see that exclusive Champagne cork in the background. The far left is the mutilated shaving brush. Second is a Birra Baladin cork, i can really recommend that beer, and yes; the brand is really important for the painting!
Over and out!
Moar Bases!
G´day.
Thought I would share another base concept that I´m working on. I´ve made some lava bases before that I´ve written about in a prevoius post. They turned out really well in my own oppinion but I would like to try another look that gives a greater contrast between the model and base so they hopefylly "pop" more. So after thinking of the classic themes I decided to go for snow/ice.
This is only a tryout. As usual I make it out of bark and later on I´m going to put some snow effect to it by mixing pva-glue with baking soda. During my tests to create a somewhat plausible snow I came up with a nice result using bicarbonate by strewing it over the pva-baking soda mix before it dries. Don´t know if you can get bicarbonate everywhere, but here in Sweden there is a difference between baking soda and bicarbonate even though it is the same chemicals. The bicarbonate are more crystallized than the soda and it doesn´t dissolve as easily in the pva-glue, therefore staying on top and giving a slightly sparkling look.
This is the result I came up with. No snow added yet. The snow is supposed to cover most part of the "snow block" only leaving parts visbile of the painted bark. The left picture is the same as the right but covered in a heavier blue glaze:


Going to try out another colour scheme, much darker, to imitate black ice. Something like the picture below. It´s taken a short walk from my apartment:

Ultimatley i would cast the "ice" with epoxy resin, mixing paint into it and do some transculent washes but it feels like it could be too much work. Maybe a thinner layer over the bark with epoxy, Vallejo Still Water or equivalent to create a feel of translucensy.
I´ll see how much time I care to spend on it. I´ll probably go for the lava base in the end.
Tally ho!
Thought I would share another base concept that I´m working on. I´ve made some lava bases before that I´ve written about in a prevoius post. They turned out really well in my own oppinion but I would like to try another look that gives a greater contrast between the model and base so they hopefylly "pop" more. So after thinking of the classic themes I decided to go for snow/ice.
This is only a tryout. As usual I make it out of bark and later on I´m going to put some snow effect to it by mixing pva-glue with baking soda. During my tests to create a somewhat plausible snow I came up with a nice result using bicarbonate by strewing it over the pva-baking soda mix before it dries. Don´t know if you can get bicarbonate everywhere, but here in Sweden there is a difference between baking soda and bicarbonate even though it is the same chemicals. The bicarbonate are more crystallized than the soda and it doesn´t dissolve as easily in the pva-glue, therefore staying on top and giving a slightly sparkling look.
This is the result I came up with. No snow added yet. The snow is supposed to cover most part of the "snow block" only leaving parts visbile of the painted bark. The left picture is the same as the right but covered in a heavier blue glaze:
Going to try out another colour scheme, much darker, to imitate black ice. Something like the picture below. It´s taken a short walk from my apartment:
Ultimatley i would cast the "ice" with epoxy resin, mixing paint into it and do some transculent washes but it feels like it could be too much work. Maybe a thinner layer over the bark with epoxy, Vallejo Still Water or equivalent to create a feel of translucensy.
I´ll see how much time I care to spend on it. I´ll probably go for the lava base in the end.
Tally ho!
Big Beastie
Alright. Got myself the Chimera model from Games Workshop two days ago and what can I say? Well, it´s an awesome looking model for sure and i think it´s going to be a bliss to paint it. The only cons I can think of is the somewhat static pose of the hind legs, I would have liked to see it with one of the legs tucked in closer to the body to make a better impression of a leap. Guess it´s leaping at the moment but it´s more like a "Meh, am I skipping or am I falling?" kind of leap. Probably beacuse it would put some strain on the mounting to the base with only one leg in contact. Could change the pose with some convertion but prefer to practice my conversion skills on cheaper models first.
The second con, thats not really a con, is that they could have put in a few more bits in the package. Only for the simple fact that leftover bits are awesome. GW´s Giant is a splendid example of bits bonanza. Everything from the leftovers can be used to scenery. Birds, barrels, cages, you name it. Going to incorporate one of the heads to one of my models. Giantslayers makes a nice visual impact. Just place it on the gaming board and all those pesky elf armies will run of the table.
Anyway, this is what the sprue look like:

Have not decided how I will paint it. Looking for interesting color choices on the net. I really like the purple/blue (blurple) on the cover, maybe I go for that. Otherwise I´ll try to use more animal like. Never seen a Zebra inspired one... The other decision is going air brush or paint brush. The air brush sollution, combined with paint brush, is probably the one giving best result. The drawback is that I´m in need of training with the air brush first. But challenges like that have never discouraged me so i think I´ll go for the latter.
Thats all for now. Next time I´ll show you how I mount my minis when painting them and show an alternative base concept.
The second con, thats not really a con, is that they could have put in a few more bits in the package. Only for the simple fact that leftover bits are awesome. GW´s Giant is a splendid example of bits bonanza. Everything from the leftovers can be used to scenery. Birds, barrels, cages, you name it. Going to incorporate one of the heads to one of my models. Giantslayers makes a nice visual impact. Just place it on the gaming board and all those pesky elf armies will run of the table.
Anyway, this is what the sprue look like:
Have not decided how I will paint it. Looking for interesting color choices on the net. I really like the purple/blue (blurple) on the cover, maybe I go for that. Otherwise I´ll try to use more animal like. Never seen a Zebra inspired one... The other decision is going air brush or paint brush. The air brush sollution, combined with paint brush, is probably the one giving best result. The drawback is that I´m in need of training with the air brush first. But challenges like that have never discouraged me so i think I´ll go for the latter.
Thats all for now. Next time I´ll show you how I mount my minis when painting them and show an alternative base concept.
Tuesday, 28 January 2014
Cleaning, Chimeras and Chaotic Cowboys
What a weekend, I actually got some stuff done for once.
Started my saturday with insane amounts of coffe to work up the steam before i woke up. Yup you read itright, my body goes on autopilot before my brain gets a good ol´ dose of caffeine kicking up ye olde body. At least thats how it feels sometimes. But i digress.
Anyway. It was a splendid day for more priming and I set to work on my Chaos Knights and was soon to be dissapointed. I had assembled the horses and riders separatley to avoid hard to reach places during the painting. I shouldnt have done that... Turned out some of these Cowboys of Chaos hadn´t done their stretching properly so they can´t sit down in the saddle. Some of them looks like they are standing up a bit. Here comes a visual of it, the top one is the one with the stiff groin.

You learn as long as you live. Next unit I´m going to assemble the riders directly on the horses to hopefully avoid this. Will try to heat this one up in hot water and bend the hanging chains that jam against the horses armor. Dont know if it works on the other ones who were reluctant to stretching after their workouts.
Anyway they are comming together and i can´t wait to paint them. Getting tired of Marauders.
I also got other things done, important things. I posted a pic of my paint station earlier that was in a state of decay that would make grandfather Nurgle proud. Well, I let the god of rot down and converted to Tzeentch, the lord of change. And it sure did change i tell you. Have a look at this handsome looking bugger:

Mmm, fresh! This will greatly aid me in my quest for colouring.
On my way home from work I went by our local Games Workshop retailer. By accident I laid my eyes on a Chimera box. Shouldn´t have done that- My brain screamed "YES!" and my wallet wailed "NOOO!", but the force is strong with my brain. Brain wins. Going to write more about this bad ass lizard-lion-something later.
Keep that paint flowing.
Started my saturday with insane amounts of coffe to work up the steam before i woke up. Yup you read itright, my body goes on autopilot before my brain gets a good ol´ dose of caffeine kicking up ye olde body. At least thats how it feels sometimes. But i digress.
Anyway. It was a splendid day for more priming and I set to work on my Chaos Knights and was soon to be dissapointed. I had assembled the horses and riders separatley to avoid hard to reach places during the painting. I shouldnt have done that... Turned out some of these Cowboys of Chaos hadn´t done their stretching properly so they can´t sit down in the saddle. Some of them looks like they are standing up a bit. Here comes a visual of it, the top one is the one with the stiff groin.
You learn as long as you live. Next unit I´m going to assemble the riders directly on the horses to hopefully avoid this. Will try to heat this one up in hot water and bend the hanging chains that jam against the horses armor. Dont know if it works on the other ones who were reluctant to stretching after their workouts.
Anyway they are comming together and i can´t wait to paint them. Getting tired of Marauders.
I also got other things done, important things. I posted a pic of my paint station earlier that was in a state of decay that would make grandfather Nurgle proud. Well, I let the god of rot down and converted to Tzeentch, the lord of change. And it sure did change i tell you. Have a look at this handsome looking bugger:
Mmm, fresh! This will greatly aid me in my quest for colouring.
On my way home from work I went by our local Games Workshop retailer. By accident I laid my eyes on a Chimera box. Shouldn´t have done that- My brain screamed "YES!" and my wallet wailed "NOOO!", but the force is strong with my brain. Brain wins. Going to write more about this bad ass lizard-lion-something later.
Keep that paint flowing.
Thursday, 23 January 2014
Mission Complete
Yesterday I executed my plans on priming in subzero temperature and it worked out suprisingly well, not like dog puke like i expected. The temp had dropped to meager -10 C.I kept the can a lot closer than i use to, about 10cm from the miniature compared to 20cm. Had to move the can a lot faster to prevent paint from pooling up on the model and I did it in pretty much complete darkness, waving around the bottle like a maniac on extacy, hoping for the paint to stick somewhere. The sun rise at 09:30 and goes down about 14:30 while I arrive from work about 16:30, poor me, life is harsh. Think I have to install a floodlight on the balcony.
Anyway, here´s a pic of the result:

The details are still there, no excessive paint pooling. If you look close there are some minor oddities, it kind of looks like the primer had problems sticking to some points. This is probably my own fault since I´ve been there with my dirty little fingers and not cared to do the mandatory washing of the heads. But overall I´m very pleased with the result and next time I´m going to try in colder weather.
Anyway, here´s a pic of the result:
The details are still there, no excessive paint pooling. If you look close there are some minor oddities, it kind of looks like the primer had problems sticking to some points. This is probably my own fault since I´ve been there with my dirty little fingers and not cared to do the mandatory washing of the heads. But overall I´m very pleased with the result and next time I´m going to try in colder weather.
Wednesday, 22 January 2014
Games Workshop stock drop
GW´s market value drop of 24% has hardly passed unnoticed in the wargaming community and shouts of doomsday can be heard all over the internet. I'm no expert in the area but i would not worry too much about these numbers since i've seen it happen to my current employer At that time it dropped whopping 31%. A little changes in the company structure, new pricing and the company is good to go with even better numbers than before. Apple dropped about 42% in April and they seem to be fine.
Good thing about it is that the company may change direction, let´s hope for better pricing even if it's a bit too much to hope for. Of course, it could all go bananas with GW shutting down taking a large part of the hobby with its fall.
Good thing about it is that the company may change direction, let´s hope for better pricing even if it's a bit too much to hope for. Of course, it could all go bananas with GW shutting down taking a large part of the hobby with its fall.
Monday, 20 January 2014
Winter is Coming
I'm currently running out of primed miniatures to paint at the moment. Would have been no problem to get around that by priming some new right? Well, not if mother nature gets to decide. We had a unnaturally mild winter so far and Mrs. Nature decided to remedy that by giving us some -30 celsius to play with. Why would that be a problem? Well, this temperature has turned my spray cans into veritable snow cannons and I'm no fan of suffocation, so doing it inside is not an answer.
Going to give it another try though. The temperature is now about -14 so keeping the can closer to the model will hopefully prevent the paint particles to freeze before they hit the miniature but I'm worried that it may give a very grainy surface. We'll see. If it turns into an disaster I´ve got other things to take care of, like my workstation that's in a chaotic state:

Going to give it another try though. The temperature is now about -14 so keeping the can closer to the model will hopefully prevent the paint particles to freeze before they hit the miniature but I'm worried that it may give a very grainy surface. We'll see. If it turns into an disaster I´ve got other things to take care of, like my workstation that's in a chaotic state:
Saturday, 18 January 2014
Lava base tutorial
Made some bases for my upcoming Chaos army the other day and decided to make a tutorial while at it. Hope you like it.
Here's one of the bases:

You can find the tutorial here: http://battlepainted.blogspot.se/p/tutorials.html
Here's one of the bases:
You can find the tutorial here: http://battlepainted.blogspot.se/p/tutorials.html
Wednesday, 15 January 2014
And so it begins...
I have been in some mexican standoff for some time now. Me and my not so painted models. Just staring at eachother for days, weeks. Nay, months! But it's time to grab the bull by it's horns and get this party started.
There have been lots of reading. Page after page of tutorials, blogs and pictures before i gathered the courage to put the brush to those vicious little buggers.
I'm going to put up some pictures in this blog with pictures of my progress and i'm thankfull for some creative criticism and advices, if someone finds their way to this page. I also plan to put up some tutorials if i feel that i achieve good results with something. Tutorial by a beginner for beginners if that makes any sense.
So, until next time. Arrivederci and so on, keep that paint flowing.
Subscribe to:
Comments (Atom)